Thursday, April 23, 2020
Thank you Leah!
I love seeing that our students at Bethpage Elementary are thriving in their creativity while learning and producing art from home. Leah Fakes sent the following beautiful artwork:
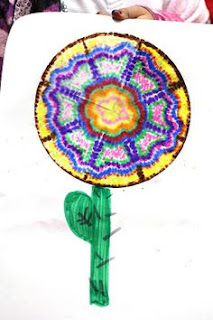
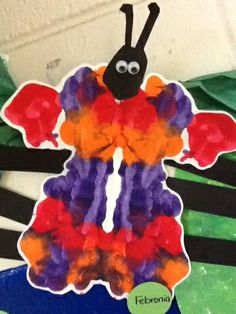
As we look at these fabulous works of art, Leah showed her knowledge of both symmetry with radial balance in the first and mirroring in the owl and butterfly. I love that she is able to add life to her owl with the catch lights in the eyes, and I love the details of the feathers. Leah demonstrated great folding skills when creating her butterfly! Leah also sent in the following images of other things she has done-I’m so proud of you!
Tuesday, April 21, 2020
Symmetry for Sure!
Thank you Tricia Maribojoc, you definitely know what symmetry looks like!!
In looking at the beautiful butterfly, Tricia you did a great job mirroring the wings, making one side look like the other. The same is true with your kite, of which you did a great job...love the tail that seems to Compliment the colors in the kite itself.
Monday, April 20, 2020
Marbling Paper at Home Made Easy!
Marbling is a wonderful way to decorate paper to use for stationary in letter writing or cards. The following is a great video to help in the process.
https://youtu.be/65e5hKRPEnA
Supplies:
Thick paper
A few different colors of food coloring (I suggest using the three primary colors: yellow, red and blue.
1 can of shaving cream
1 stick for swirling the colors
Steps:
Fill a pan that’s kind of flat with shaving cream, then add squirts of food coloring. Take the stick and “Slightly” stir to mix and spread colors some. Lay paper on top so it just touches the shaving cream. Pull the paper up and squeegee off excess. Let dry and begin with your special letter writing.
Making Colorful Art with Bubbles!
We can make unusual artwork just by mixing a little food coloring with soap and water!
Supplies:
3 Tablespoons of soap
3 short glasses
3 primary colors of food coloring: yellow, red and blue (as many drops as you like, but start with just 3 or 4)
3 cups of water
3 straws
1 fairly large paper that is not too thin
Step 1:
Begin by placing 1 Tblsp. of soap in each glass.
Step 2:
Add 1 cup of water to each glass, along with 1 color of food coloring per glass.
Step 3:
Take the straws and begin blowing bubbles. If the colorful bubbles are slow to rise to top of glass, add a little more soap.
Last:
Quickly take your paper and Gently lay it on top of bubbles. As you raise your paper up you’ll see the beautiful colors and shapes you are making. You will notice that the primary colors begin to mix, creating other colors of the rainbow.
Hint:
Be careful to not let your paper get too “watery”, and try keeping it flat until it dries.
Remember our rule in art class, Be Sure to Have Fun!
Tuesday, April 14, 2020
Let’s Make a Kite
Making and flying kites can be a fun activity to do with your family. We have been talking about symmetry in art, and kites are definitely symmetrical. Kite making is where science and art come together, fusing beauty and design with the science of aerodynamics. Have your parents help gather materials and follow the steps outlined in the following video. Have Fun!
Hello Spring!
This is a spring inspired painting byAvery West:
Avery explained to me that she thought of spring and the Easter Bunny while painting this beautiful canvas. I love the colors she used which definitely reminds me of spring. I also could add that this painting is also an illustration of symmetry since if we were to draw an imaginary line down the center, it is fairly balanced. Thank you Avery for your gorgeous contribution!
Monday, April 6, 2020
Continuing with Radial Balance-Gades 3rd-5th
Continuing with Radial Balance-Gades 3rd-5th
Hey kids, let’s try our hand at drawing some mandalas using the art idea of Radial Balance. A mandala is a circular image that illustrates lines, shapes and colors radiating out from a center point.
Supplies Needed: You will need washable markers, coffee filters and a spray bottle with water. An optional item would be a sharpie or any type of permanent marker.
First Step: Begin by laying the coffee filter out flat. Visualize how you want your artwork to look in the end before using any art materials. Here are some ideas-
Second Step: Start designing! You may draw first some designs with a permanent marker, but not necessary. Be thoughtful about the colors you use...complimentary colors next to one another would be very nice: yellow next to purple, red next to green, and blue next to orange.
Third Step: Spray whole filter with water and watch colors soften and mix together slightly. The coffee filter diffuses the color.
Last: When dry, think of how you can add to your work, or what you can make out of it. How will you display it. Look below for ideas and possibly write a short story telling about your object. If you have something you want to share please send it to me and I’ll post it on the blog!
Continuing with Symmetry-Grades K-2
Continuing with Symmetry-Grades K-2
This week let’s have some fun making little creatures using homemade paint and
the art idea of Symmetry.
1st Step: Make paint by following instructions in the following video
2nd Step: Create! Take a sheet of paper and fold it in half.
3rd Step: Paint on only one side of your paper. You can use a variety of colors or just a few, whatever you would like.
4th Step: The fun part, fold the paper and squash the paint in between pages just a little so as to not let the paint drop outside the paper and make a mess.
Last: Viola, Symmetry! Now decide on what creature you have made and add legs and antenna how you see fit! If you have something to share send it to me and I’ll post on it the blog.
Thursday, April 2, 2020
Radial Symmetry
Radial Symmetry-
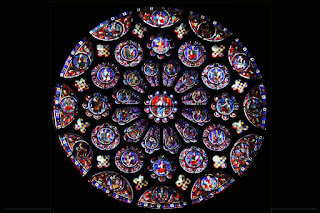
This type of symmetry is where lines or objects radiate out from a central axis. It really has no left or right sides as in Reflection Symmetry. And we can find Radial Symmetry all around us if we take the time to search for it:
Assignment: Observe objects in your environment and try to find Radial Symmetry.
Symmetry
Symmetry-
Symmetry is one of the last art topics we touched for many of our art classes. There are several different kinds of symmetry, although we will primarily focus on Reflection Symmetry and Radial Symmetry.
Reflection Symmetry-
This is a type of symmetry where one side of an image is a mirror image (reflection) of the other. This form of symmetry is all around us and if we pay attention we will see find it:
Assignment: Observe objects in your environment and try to find Reflection Symmetry.
Short video on Reflection Symmetry:
Creating at Home,
Hey kids, being at home with our loved ones gives us a unique opportunity to share special moments, while expressing generosity, appreciation, and thankfulness to all of those around us. This can be done through letter writing, making cards or drawing a nice pictures. We also want to continue with our learning process in fun and creative ways to further develop our skills as students and artists. One thing is always true, we can create art wherever we are from whatever we have available to us, adding joy and beauty to our lives.
One of my sons enjoys making cards and recently made this one letting me know how much he loves and appreciates me.
Each week we are out of school, I plan to give you an art idea, or add to an idea from your teacher, to help guide and enhance your learning experience. So STAY TUNED and keep visiting the Bethpage Elementary Art Blog!
2020 Sumner County Art Exhibit at Vol State
Congratulations to the following Bethpage Elementary art students for having their work chosen to be displayed in this year’s Sumner County Art Exhibit: All of our students have done an outstanding job, and these are just a few examples of the kind of creativity and hard work I like to see.
(Beginning from top left to right) Tobin Tucker, 5th, Braxton Wright, 5th, Kylie Sneed, 5th, Elijah Douglas, 4th, Ryan Rincon-Izquierdo, 4th, Mason Hardaway, 5th, Kylie Huntsman, 1st, Abbigail Hunt, 5th, Lorraine Sneed, 2nd, Maddison Wallace, 3rd, Jordan’s McFadden, 5th, Vivian Phillips, 4th, Braden Vaske, 4th, Adam Law, 5th, Corbin Smith, 3rd, Tucker Cook, 1st, Tristan Cook Parkhurst, 2nd, Lauren Keene, K, Brooklyn Menz, K, Tyler Tilton, 2nd, and Leah Fakes, 2nd.
Subscribe to:
Comments (Atom)
Welcome Back Bethpage Students, We Have Missed You!
Welcome Back Bethpage Students, We Have Missed You! These first couple of weeks are basically start up weeks. We are getting used to being...


